In this tutorial I'm going to show you how to download, install and configure Adruino IDE to program your adruino board.
Step 1: Download the software

The first thing to do is to download th Adruino IDE.
Go to the Adruino IDE download page and download the software for your respective OS and architecture. The IDE is of around 50MB.

Step 2: Install
Install the package you downloaded into your complete as a normal software.
Step 3: Configuring the IDE

Open the Adruino IDE you recently installed. It will be located in C:\Program Files\Adruino by default.
Run the executable to open up the IDE.
Select Board

The first thing we have to do is to tell IDE what type of Adruino Board we have
Go to Tools -> Board ->Select the board which you have
Select the Port

The next is to select the port on which your adruino board is connected to your PC or MAC
On a Windows PC it will be a COM port (something like COM1 or COM2)
On a Mac it will be something like tty.usbserial-xxxx
Note - If you don't know which port is your board connected to remove your board and replug it and the port whose value changes is the port.
Step 4: Verify and Compile Your program

The first step to getting a Program ready for transfer over the adruino is to verify and compile it. That means check it over for errors and transslate it into an Adruino compatible code.
To compile your code Go to Sketch -> Verify/compile or press Ctrl+R

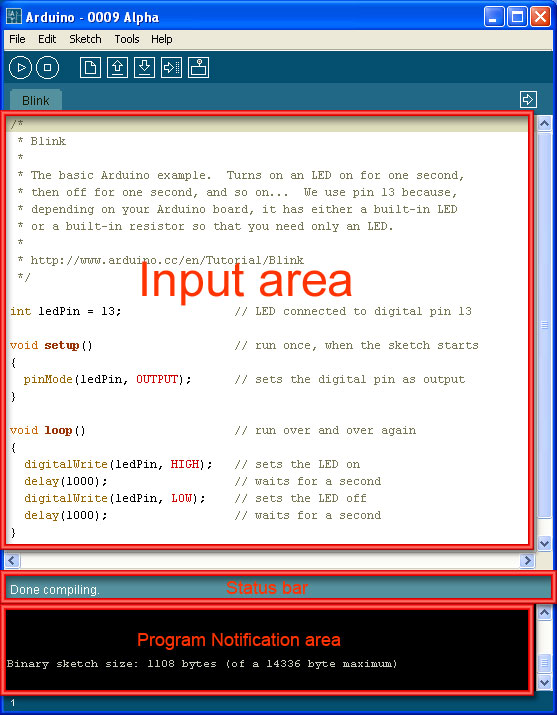
After a few Seconds you will see Done Compiling in Status bar and Binary Sketch Size in Notification Area of IDE. This means the sketch is ready for uploading to the Adruino board.
Step 5: Uploading the sketch

Now it's time to upload your sketch to Adruino board. Make sure your Adruino is plugged in and power led is on.
Now Go to Sketch -> Upload or Ctrl+U.
When your code is uploading the RX led will be on indicating your adruino is receiving the code.
After few seconds you will see Done uploading in status bar.
That's it in this tutorial stay tuned for more
No comments:
Post a Comment